Why You’ll Love This Gulab Jamun Recipe
When you take your first bite of these homemade Gulab Jamuns, you’ll understand why this recipe is a cherished favorite.
The soft, melt-in-your-mouth texture paired with the sweet rose-infused syrup creates an irresistible experience. I love how each bite transports me to festive celebrations, evoking memories of family gatherings and joy.
This recipe’s simplicity means I can whip it up anytime, bringing a taste of tradition into my home. Plus, the aroma of frying in ghee fills the kitchen with warmth, making it a perfect treat for both special occasions and everyday moments.
You won’t want to stop at one!
Ingredients of Gulab Jamun
Making Gulab Jamun is like taking a step into a world of sweet indulgence, where every ingredient plays a part in creating a magical dessert. You’ll want to gather everything before diving in, as the process can feel like a whirlwind of flavor and sweetness. Trust me, having all your ingredients on hand will make your cooking experience much smoother.
So, let’s check what you’ll need to whip up these delightful treats.
Ingredients for Gulab Jamun:
- 1 liter milk
- 2 cups powdered milk
- 1 1/2 tablespoons flour
- 1 1/2 tablespoons self-rising flour
- 1/2 cup warm milk
- 1 teaspoon ghee or butter
- 2 cups sugar
- 2 cups water
- 1 tablespoon rose water or 1/2 teaspoon rose extract
- 1/2 teaspoon saffron (optional)
- 1/2 teaspoon cardamom powder
- 1 lb unsalted or salted butter (for making ghee)
Now, let’s talk a little about these ingredients. You might be wondering if you can swap anything out or if it’s essential to use the exact measurements.
While precision can be important in baking, Gulab Jamun does allow for a bit of flexibility. For example, if you don’t have ghee, butter will work just fine—though I’d say ghee gives it that authentic touch.
The saffron is optional, but oh boy, does it elevate the flavor and color! If you’re feeling adventurous, give it a try.
And remember, the joy of making this sweet dish isn’t just in the ingredients but in the love and care you put into each step. So, roll up your sleeves, and let’s get ready for some fun in the kitchen!
How to Make Gulab Jamun

Alright, let’s plunge into the sweet world of Gulab Jamun. First up, you’ll need to prepare the dough, and trust me, this is where the magic begins. Start by taking 1 liter of milk and bringing it to a boil in a heavy-bottomed pan. You want to stir it continuously to avoid that awkward moment when it sticks to the bottom and burns—nobody wants burnt milk in their dessert.
Keep boiling until it thickens into a paste. Once you reach that glorious consistency, you can mix in your 1 1/2 tablespoons of flour and blend it until it’s smooth. This is the moment when you can feel like a culinary genius, creating something amazing from simple ingredients.
Now, if you want to take a shortcut, you can skip the boiling milk method and opt for the powdered-milk route. Just combine 2 cups of powdered milk with 1 1/2 tablespoons of self-rising flour and gradually mix in 1/2 cup of warm milk and 1 teaspoon of ghee or butter. It’s like a quick cheat code for your Gulab Jamun.
Once you have your dough ready, oil your hands and form about 24 uniform balls—aim for the size of a small marble. They don’t have to be perfect, but hey, we’re going for some aesthetic appeal here.
Now comes the delicate part—frying those little beauties. Heat up some ghee in a wok or karai, about 2.5-3 inches deep, on low heat (yes, low heat is key). You want it to reach around 215 degrees before you gently slip in the balls.
Watch them sink like little stones at first, but don’t panic. They’ll start floating after about 5 minutes! Just gently shake the pan to keep them from browning too much on one side. As they fry, the ghee will warm up, and by the time you hit the 20-minute mark, they should be a lovely golden brown.
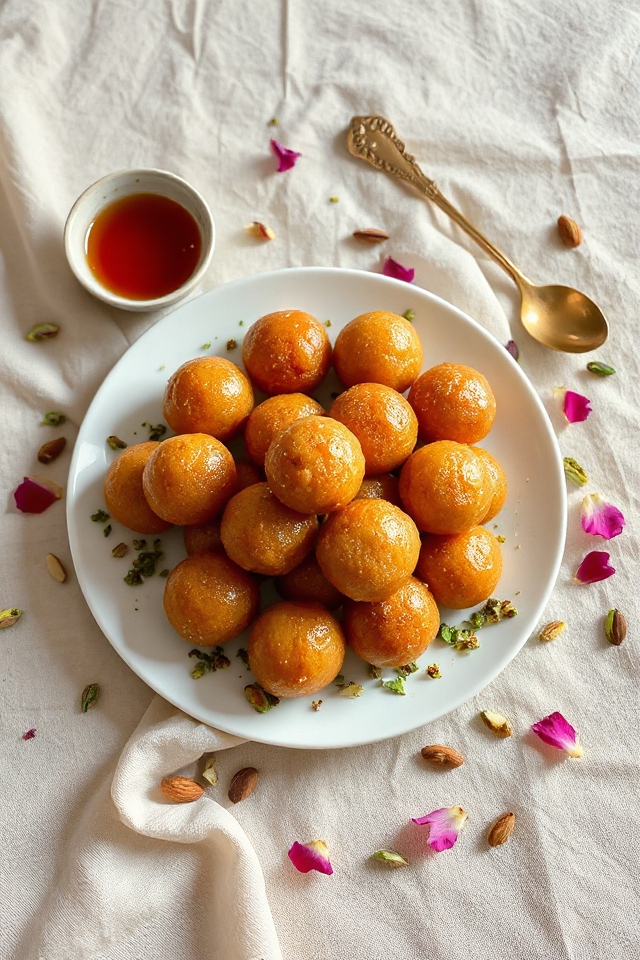
Once they’re done frying, pop one in the syrup (made from 2 cups sugar and 2 cups water boiled for 3 minutes, with a splash of rose water), and if it holds its shape, you’re golden—literally! Let them soak for at least 2 hours before serving.
You’ll want to enjoy them at room temperature, or warmed up if you’re feeling fancy. And there you have it, a delightful batch of Gulab Jamun that’s sure to impress.
Gulab Jamun Substitutions & Variations
While traditional Gulab Jamun is a beloved classic, there are plenty of substitutions and variations that can add a personal twist to this delightful dessert.
For a healthier option, I sometimes use khoya instead of milk powder. If I want a unique flavor, I add a hint of orange zest or almond extract.
You can also swap the rose water for cardamom or vanilla for a different aroma. Experimenting with different sweeteners, like jaggery or coconut sugar, can create interesting flavor profiles.
Don’t hesitate to play around—each variation brings a new charm to this cherished treat!
What to Serve with Gulab Jamun
After exploring the delightful variations of Gulab Jamun, it’s time to think about how to elevate this sweet treat even further.
I love serving Gulab Jamun with a scoop of vanilla ice cream; the contrast of warm and cold creates a heavenly experience. You can also pair it with a fragrant chai or rich coffee, which enhances the flavors beautifully.
For a touch of elegance, drizzle some chocolate sauce on top or sprinkle crushed pistachios for added crunch.
Don’t forget to have some fresh fruits on the side, like mango or berries, to balance out the sweetness. Enjoy!
Additional Tips & Notes
To guarantee your Gulab Jamun turns out perfectly, I recommend paying close attention to the temperature of the ghee while frying. A gentle, low heat is essential; if it’s too hot, the balls can burn. If you notice them browning too quickly, lower the heat further.
Also, oil your hands while shaping the dough to prevent sticking. For added flavor, consider using fresh cardamom pods instead of powder. After soaking in syrup, let them cool slightly before serving.
Finally, remember that patience is key—allowing them to rest enhances their flavor and texture. Enjoy your homemade treat!